WP Adminify
Admin Menu Editor for WordPress Dashboard
The Admin Menu Settings in WP Adminify provide extensive customization options to personalize the WordPress admin interface. These settings are designed to enhance the user experience by allowing you to modify the appearance, structure, and functionality of the WordPress admin menu. The settings are organized into three main tabs: Menu Editor, Settings, and Styles. Each tab offers a range of options to help you tailor the admin menu to suit your needs.
Admin Menu Editor
The Menu Editor tab is the central hub for customizing the structure and content of your WordPress admin menu. This powerful tool gives you control over how the menu items are displayed, their order, and even the icons associated with them.
Dashboard Customization
- Rename Dashboard: This option allows you to rename the default "Dashboard" menu item to something more relevant to your needs. For example, you could rename it to "Home" or "Admin Home."
- Change Dashboard Link: You can modify the default link associated with the Dashboard menu item. This could be useful if you have a custom dashboard or a different landing page you prefer to use.
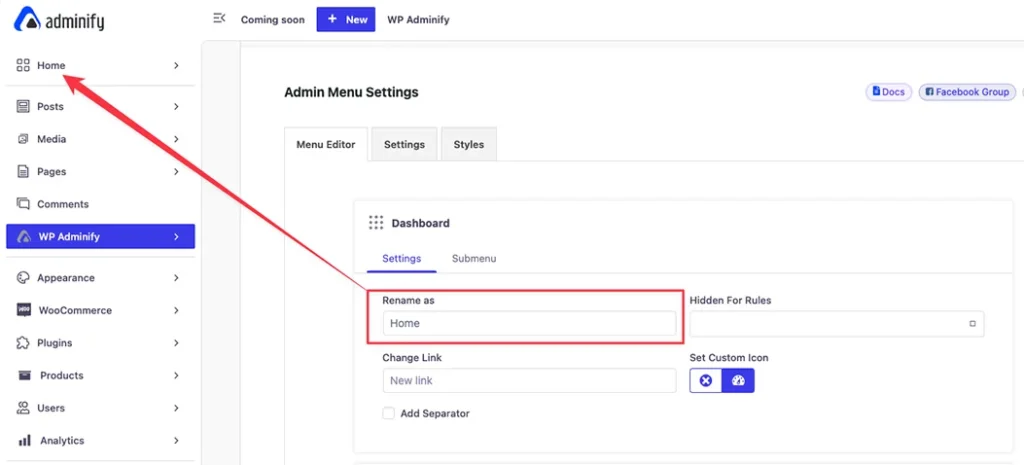
Set Custom Icon
- Custom Icons for Menu Items: WP Adminify lets you replace the default WordPress icons with custom ones. You can either choose from a library of available icons or upload your own. This feature helps in making the menu more intuitive and visually appealing.
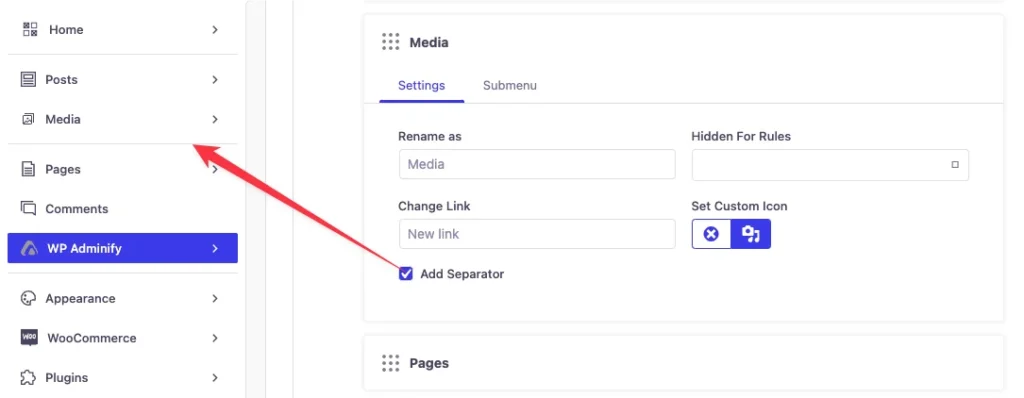
Add Separator
- Insert Separators: For better organization and a cleaner interface, you can insert separators between different menu items. Separators act as visual dividers that help group related items together, making the menu easier to navigate.
Other Menu Items Customization
- Customize or Reorder Menu Items: The menu editor lists all the available menu items such as Posts, Media, Pages, Comments, etc. You can customize the label, icon, and order of these items. This feature allows you to rearrange the menu in a way that suits your workflow.
Add Custom Menu Item
- Add New Menu Items: At the bottom of the menu editor, you have the option to add new custom menu items. This is particularly useful if you have custom plugins or pages that you frequently access and want to include directly in the admin menu for quick access.
Settings
The Settings tab provides options to configure the overall behavior and layout of the admin menu. This tab is where you define how the menu behaves and what type of content is displayed.
Menu Type
- Vertical Menu: This is the traditional WordPress menu layout that appears on the left side of the admin interface. It's the most commonly used layout and supports extensive customization.
- Horizontal Menu: This layout places the menu items in a horizontal bar at the top of the admin interface, which can be a preferred choice for those who want to save vertical space.
Menu Mode (for Vertical Menu)
- Default: This mode displays the menu in its standard, full-width format.
- Folded: In this mode, the menu is collapsed to show only icons, saving space and reducing clutter.
- Rounded: This style rounds the corners of the menu, giving it a softer, more modern look.
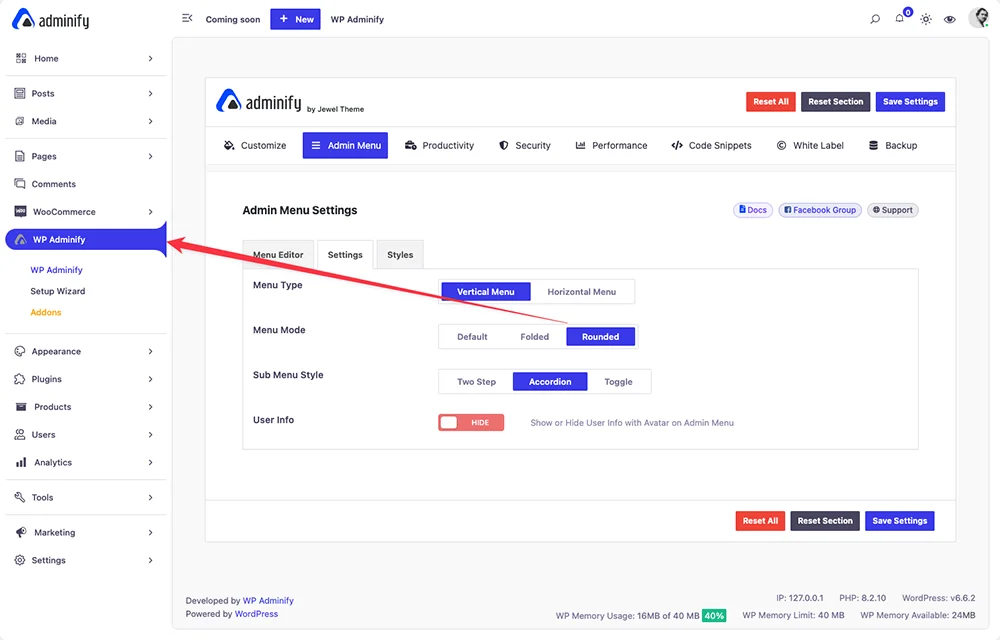
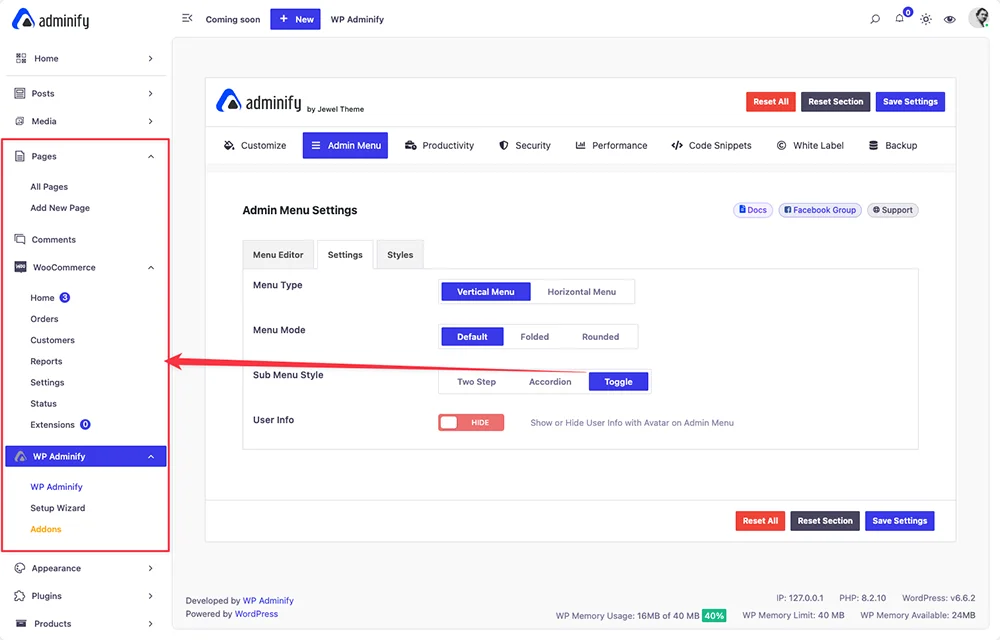
Sub Menu Style (for Vertical Menu)
- Two Step: Submenu items are displayed in a two-step dropdown process, which is useful for deep hierarchies.
- Accordion: This style opens the submenu items in an accordion fashion, ensuring only one submenu is expanded at a time.
- Toggle: Submenus can be toggled open or closed, allowing for greater flexibility in navigation.
User Info
- Show/Hide User Information: This option toggles the display of user information, including the avatar and username, at the top of the admin menu. This can be useful for sites with multiple users, providing a quick reference to the logged-in user.
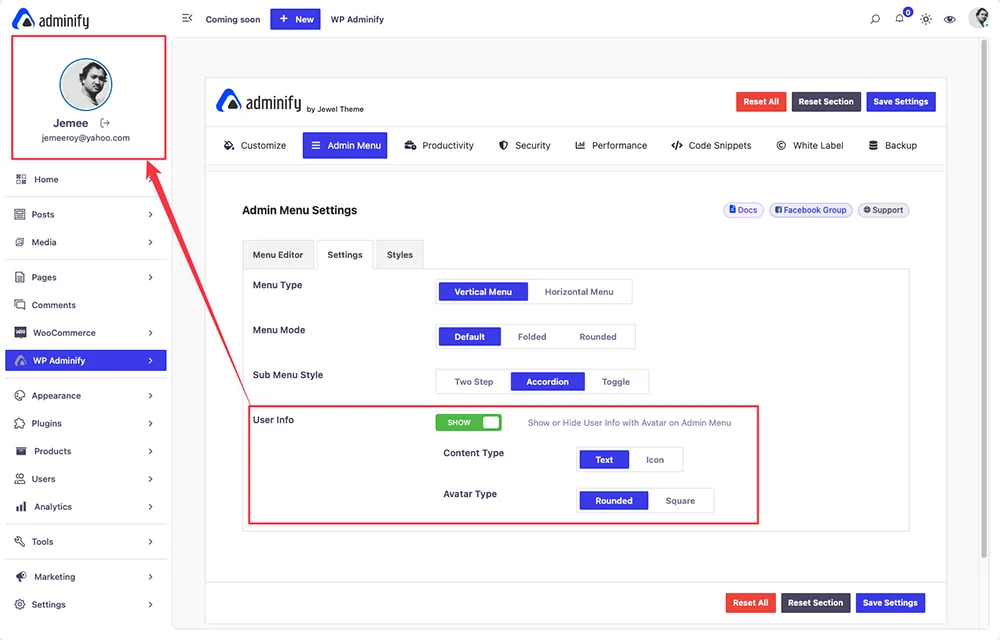
Content Type
- Text or Icon: Choose how the menu items are displayed. You can opt for a text-only display, an icon-only display, or a combination of both.
Avatar Type
- Rounded or Square: Customize the shape of the user avatar displayed in the admin menu. Rounded avatars are more modern, while square avatars offer a more traditional look.
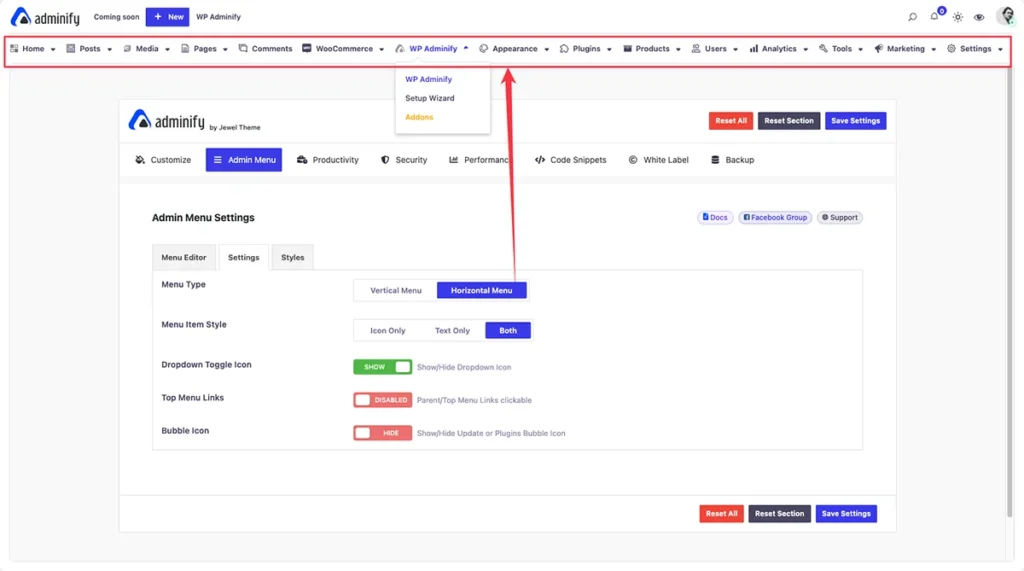
Settings for Horizontal Menu
- Menu Item Style: Choose how menu items are displayed in the horizontal layout:
a. Icon Only: Displays only the icons of menu items.
b. Text Only: Displays only the text labels of menu items.
c. Both: Displays both the icon and text for each menu item. - Dropdown Toggle Icon: Enable or disable the display of dropdown icons next to menu items that have submenus.
- Top Menu Links: This option allows you to enable or disable clickable parent/top menu links. When disabled, only the submenu items are clickable.
- Bubble Icon: Toggle the visibility of update or plugin bubble icons that appear next to menu items, indicating the number of updates or notifications.
Styles
The Styles tab is where you can fine-tune the visual aspects of the admin menu. This tab provides comprehensive options to adjust the appearance, ensuring the menu aligns with your branding and preferences.
Font Settings
- Font Size: Customize the font size of the menu items to make them larger or smaller, depending on your preference.
- Line Height: Adjust the line height for better readability or a more compact menu.
- Letter Spacing: Modify the spacing between letters in the menu item text for a more tailored appearance.
Menu Width (for Vertical Layout)
- Set Menu Width: This option allows you to define the width of the vertical admin menu. A wider menu can accommodate longer text labels, while a narrower menu saves screen space.
Menu Wrapper Padding
- Customize Wrapper Padding: Adjust the padding around the menu wrapper to create more or less space between the menu and the rest of the admin interface.
Parent Menu Horizontal Padding
- Horizontal Padding for Parent Items: Set the amount of horizontal padding for parent menu items, which helps in adjusting the menu's overall width and alignment.
Sub Menu Wrapper Padding
- Padding for Submenu Wrappers: Customize the padding for submenu wrappers to ensure consistent spacing and a clean look.
Sub Menu Vertical Padding
- Vertical Padding for Submenu Items: Adjust the vertical padding between submenu items for better readability and a more polished appearance.
Color Settings
- Parent Menu Colors: This section allows you to customize the colors for various aspects of the parent menu, including:
a. Wrap Background: The background color of the entire menu.
b. Menu Hover: The color used when hovering over a menu item.
c. Text: The default text color of the menu items.
d. Text Hover: The text color when hovering over a menu item.
e. Active Menu Background: The background color of the currently active menu item.
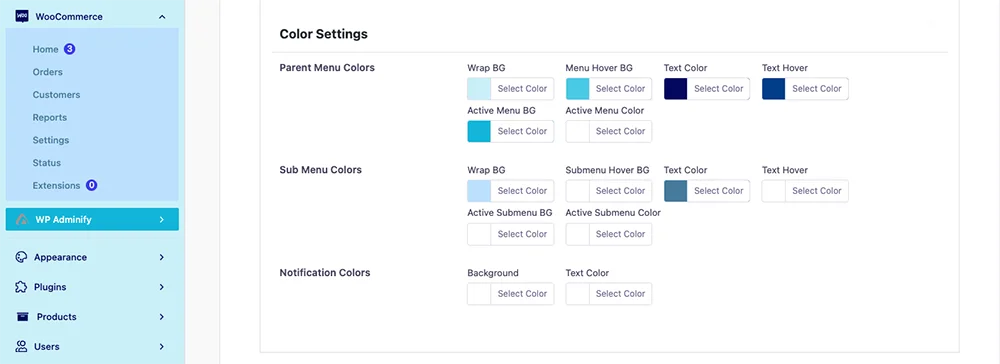
- Sub Menu Colors: Customize the colors for submenu items, including:
a. Wrap Background: The background color of the submenu wrapper.
b. Hover: The background color when hovering over a submenu item.
c. Text: The text color of submenu items.
d. Text Hover: The text color when hovering over a submenu item.
e. Active Submenu Background: The background color of the currently active submenu item. - Notification Colors: This setting allows you to choose the background and text colors for notification bubbles that appear next to menu items, typically indicating updates or new notifications.
The Admin Menu Settings in WP Adminify provide comprehensive control over the WordPress admin interface, allowing you to create a personalized and efficient workspace. Whether you're customizing the structure, adjusting the behavior, or styling the appearance of the menu, these settings offer the flexibility needed to meet your specific needs. By leveraging these options, you can create an admin environment that is not only functional but also visually aligned with your brand and preferences.
Didn’t find what you were looking for? Get in touch!
Updated on December 2, 2024
Was this helpful to you?